Zoom Meeting Support Materials
- Instructor Guide: Getting Started with UW Zoom
- Zoom Meeting Management
- Zoom Resources
- Zoom Student Guide
- Zoom Support Site
- Zoom Teaching Workflow (Canvas Zoom App)
Zoom Meeting Management
Zoom allows you to turn some functionality on or off during a meeting as needed. Here are some key areas and functionality that you may want to use in your course meetings to ensure that the everything goes smoothly, and you know what to do if anything comes up.
Waiting Room
We recommend you turn on the waiting room for your meetings. You can specify that only Users not in your account must be manually admited from the waiting room to reduce managing participants. The Waiting Room helps ensure that only participants are only those who should be in the class.
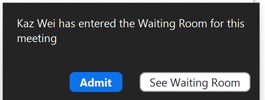
The waiting room allows you control over who can enter the room. A pop-up message will appear above the Participants List on the Meeting Toolbar indicating who is waiting to be allowed in. If only one person is waiting, you'll have the option to Admit. Otherwise, you will need to select See Waiting Room to admit participants.
The Waiting Room is found at the top of the Participants List. There, you have the option to send a Message to everyone in the Waiting Room, Admit All or to roll over each of the names and click on Admit or Remove one at a time.
Security Icon
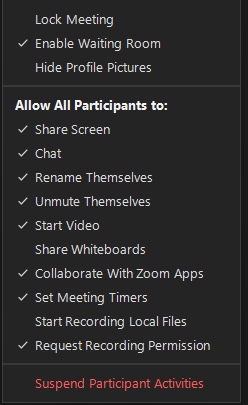
The Security Icon on the Meeting Toolbar has these options regarding what participants are allowed to do that you may want to change during a meeting:
- Share Screen: You can turn off Participants’ ability to Share Screen
- Chat: You can turn off Participants’ ability to Chat
- Rename Themselves: UW Participants come in with their official system name. You can allow them to rename themselves to have their preferred name or add pronouns.
- Unmute Themselves: You can turn off Participant’s ability to Unmute themselves (before or after muting all). Also available under the … button on the Participants List.
You are also able to Remove Participant if anyone who should not be in the class has joined the meeting or Report... someone to Zoom. These options are also available under the … button on the Participants List.
This menu does change slightly while a Share Screen is occurring, adding the option to turn on Annotate on Shared Content for Participants.
This is in a meeting where By default, only the user who is sharing can annotate has been checked.
Participants List
At the bottom of the Participant List pane, you can Mute All as well as do the following by clicking on the … button:
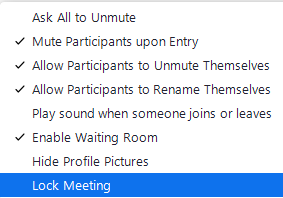
- Ask All to Unmute
- Mute Participants upon Entry
We recommend you create meetings with this setting enabled, but you can change it here. - Allow Participants to Unmute themselves
- Play sound when someone joins or leaves
This menu also shows you whether you have the Waiting Room enabled, with the option to change it. You can also lock the room, although given some Participants Internet connectivity, we would recommend enabling the waiting room over this option.

When you hover over a name on the Participants List, you have the option to ask someone who is muted to unmute themselves (assuming this is allowed by the Unmute Themselves setting in Security).
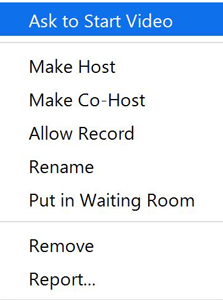
Under the More > button, you may find these options useful:
- Make Host: If you want someone else to manage breakout rooms.
- Make Co-Host: anyone who needs elevated permissions to manage students in the room.
- Rename: If a student has come in with their parent’s Zoom account or is otherwise incorrectly named, you can rename them.
- Remove: kick out anyone who should not be in the class has joined the meeting.
Taking Attendance
There is a lot going on during class but you can save taking attendance for afterward. The Usage Report in your Zoom online profile includes a column for Participants whose values are linked to an exportable list (blue Export button) of Participants including name, join time, leave time, calculated duration, and, if provided, email. Note that the initial search is ranged for the past 24 hours so you may need to adjust this depending upon when you view the report.
NOTE: This works best if you have authentication turned on so every Participant is identified by their name and email address.