Using UW GitHub Classroom
Creating Assignments
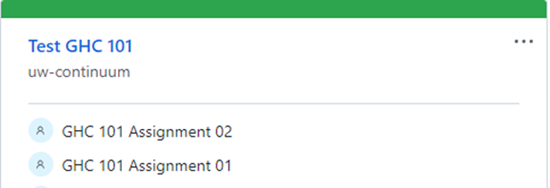
Once your UW GitHub Classroom has been created, you can begin creating assignments! Or, you can reuse assignments from other classrooms if you have them set up in an existing GHC.
NOTE: While assignments sort alphabetically within their Classroom, they sort based on their creation date on the main GitHub Classroom page, with the newest assignment first. If this matters to you, plan out your creation order accordingly.
To get started, you can either use the ... menu in the upper right-hand corner on the main GitHub Classroom page and choose "Create Assignment", or use the New Assignment button inside your specific GitHub Classroom.
- Enter the Assignment title.
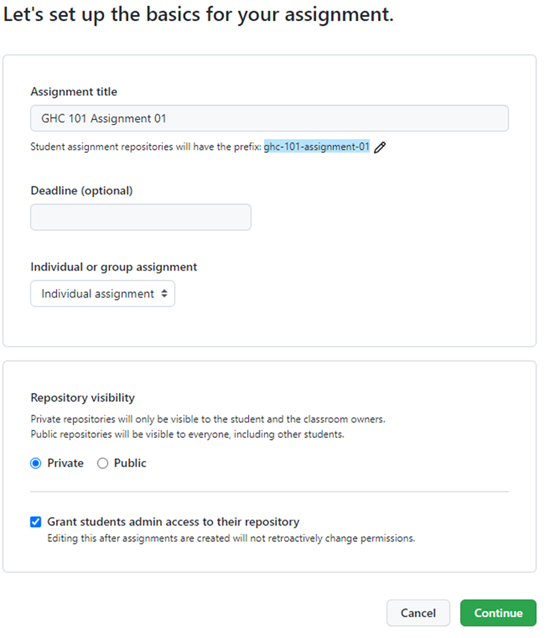
This creates the prefix for all student repositories. There is a 60 character limit. We recommend using the same Assignment title that appears in Canvas to help students navigate these two spaces.
NOTE: If your program is using one organization for all courses, start assignment names with a course identifier to minimize confusion as to which course any repository belongs. - Keep Repository visibility Private to ensure learner privacy.
- Grant students admin access to their repository.
We recommend this setting to reduce your management load and give students hands-on experience managing their repositories. - Click the Continue button.
- Select the template repository for the assignment starter code.
The starter repository must be a template repository, that is either Public or Internal. We recommend having your template repositories on the same UW GitHub Org being used for GitHub Classroom.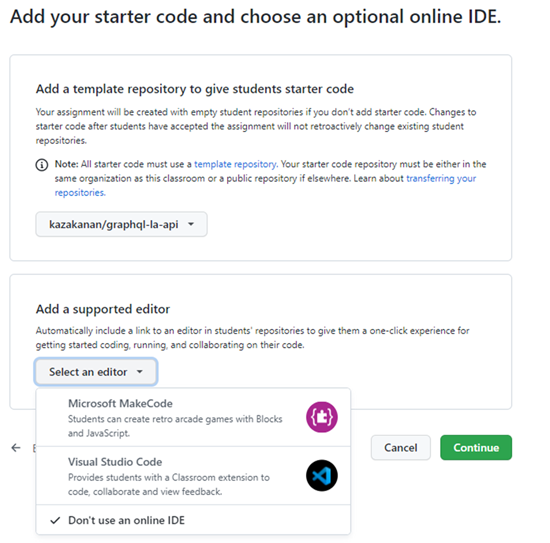
- Select an editor.
You can either add one of the supported editor options or use the default setting "Don't use an online IDE" - Click the Continue button.
- Autograding Tests.
If you have autograding tests, you can add those here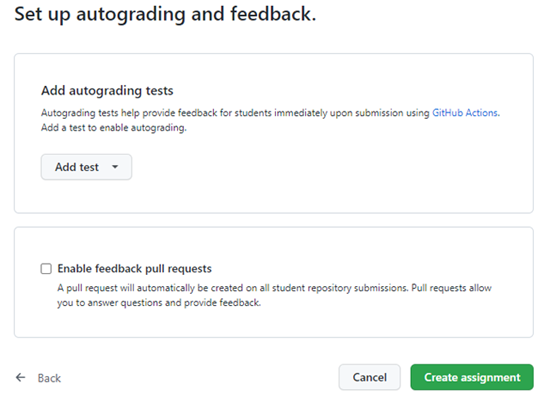
- Enable feedback pull requests.
We recommend that you not enabling feedback pull requests as these are created immediately with the repository and they prevent students experiencing how they would use GitHub on the job. Let students create their pull requests when they are ready. - Click the Create assignment button.
Including Assignments in Canvas
For students to use the GitHub Classroom assignment you created, they first need an invitation link to accept the assignment. After you have created the assignment in GitHub Classroom, you can copy its invitation link either by using the Copy invitation link button in the center of the success page, or by using the persistent clipboard icon in the area under the header.

This invitation link can be put anywhere in your course, but we recommend including it as part of a Canvas assignment for ease of grading, tracking, and as a way to keep an authoritative record of each student's work. Since UW's agreement with GitHub does not include using GitHub as a system of record for student work, students must upload a zip file of their repositories to Canvas for this retention requirement.
Canvas assignments using GitHub Classroom should include the following:
- The ability for students to use whatever GitHub account they prefer.
For security, we recommend that everyone associate their GitHub account with their UW NetID email. - The invitation link to the GitHub Classroom assignment that uses meaningful link
text to convey the destination of the link, such as:
Accept Lesson 02: Python in Action to complete this assignment. - Instructions for how to upload the zip file of their GitHub repository work.
- Instructions to include their pull request or other needed URL in the Comments section of the file upload screen.
- Any details around when and how you expect the student to make the submission—pull requests, URLs, etc.
- Uploading a zip file of their repository as the submission.
Under Submission Type, check the box by "File Uploads," check "Restrict Upload File Types," and enter zip and 7z.
The Supporting Student Use section contains an example of an assignment that uses GitHub Classroom with a zip file submission.
Reusing Assignments
Before you start this process, make sure that your current assignments are using repositories that are templates. At some point, GHC began making copies of the template repository that was specified to create the assignment to use but GHC is not making this repository a template so it cannot be reused without explicitly changing the repository being pointed to by the assignment!
From the GitHub Classroom dashboard:
- Expand the ... menu in the righthand corner of the classroom that contains assignments to reuse.
- Select the Reuse Assignment option.
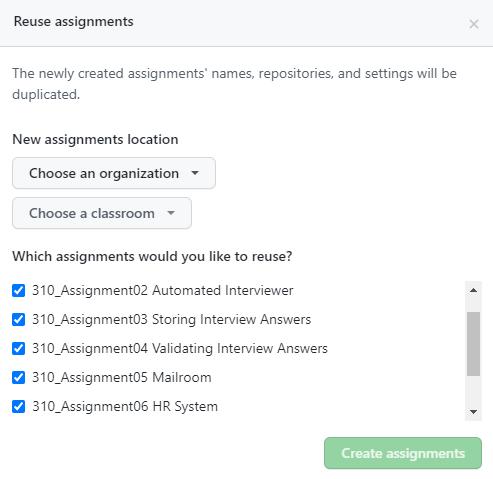
- This brings up the Reuse assignments popup where you:
- Choose an organization
Select the name of your UW Organization associated with the program you are working on. - Choose a classroom
Select the name of the new classroom you will be reusing assignments in. - Uncheck any of the assignments that will not be reused.
- Click the Create assignments button.
- Choose an organization
- You will then need to update the invite links in Canvas for each assignment.
Supporting Student Use
Please include a customized version of the following information in your Canvas course to support students in their use of GitHub Classroom. The Local Git Setup section and other content related to using Git locally should be removed if students do not need to install Git.
GitHub Classroom Information Example
Using GitHub Classroom
We'll be using GitHub Classroom for assignments in this course. GitHub is a distributed version control system for storing code repositories, which allows you to work and receive feedback from us within the GitHub environment.
You need to have a GitHub account to use as a part of this course, so think about the following:
- If you have any privacy concerns around using GitHub, you can use a pseudonym instead of your real name for your course GitHub account.
- Your account name is used in the name the private repositories created for each of your assignments, and is visible to both your instructors and your classmates.
- If you have an existing GitHub account, you can attach your @uw email address to it for better integration with the UW's GitHub Classroom instance.
- Make sure your instructor knows what GitHub username you will be using for your coursework.
Our GitHub Classroom Cheat Sheet walks you through setting up a GitHub account, if you are creating one, and accepting assignments in GitHub Classroom.
Local Git Setup
- Set up Git on the computer you will use for developing your code for this course. If you use Windows, you need to set up Git for Windows if you haven't done so already.
- Select a folder/directory within that development system for keeping your work. This is the folder where all your assignment repositories will reside.
Accepting an Assignment
Each assignment page contains an Accepting your assignment section. Click on the GitHub Classroom link to accept the invitation to the corresponding assignment.
Some things to consider:
- You must accept each assignment individually.
- Accepting an assignment triggers the creation of the private repository where you can work on your assignment. This repository is only assigned to you. Any work you do there does not affect the work of your classmates.
- The name of the new repository includes your GitHub username at the end.
- Each repository includes a README file with the instructions for the assignment.
Once an assignment repository has been created for you, go to its link and clone it on your development system, under the folder you selected for this purpose. (See GitHub's official guide on how to clone a repository)
Before you start working on your assignment
GitHub does version control through the use of branches (copies) of a code repository where changes are made. When a branch is ready to be merged back into the main code repository, a pull request is created that indicates the code is ready for review before the merge occurs.
In this course, the first thing you must do before beginning work on each assignment is to create a branch within your repository, called development. All of your work needs to be done and committed (saved) within the development branch. Do not commit any changes into the main branch.
To create the development branch, go to your local clone of the repository and type:
git branch development
Now, switch to the development branch by typing:
git checkout development
You are ready to start coding your assignment!
Committing your code
A "commit" is snapshot of your code (and any other files included in your project). You are encouraged to make frequent commits, as this makes it easier for you to restore your code to an earlier state if anything goes wrong.
To create a new commit:
- Make sure you are in the repository's folder in your development system.
- Type the following to add all files and subdirectories in the folder to your commit
(note the command includes a dot, so make sure you include it as well):
git add .
- Commit your code by typing the following:
git commit -m "Commit message"
Note that Commit message should be replaced with something descriptive of what that commit includes ("added new functionality", "fixed floating point error", "ready for review", etc.), that helps you remember what that particular commit was about. Keep in mind that using non-alpha-numeric characters in a quoted comment message may cause parsing issues.
Pushing your code
"Pushing" refers to the process of synchronizing the commits you have made on your development system into your GitHub repository. This is an important process, since it is needed before you can submit your code for review. Also, it provides you with a copy of your code that could be used if your local development system fails.
You can push your code immediately after every commit or do it once a day (in which case, all commits are included in a single push). To do it, simply type:
git push
The first time you push your code to a repository, GitHub asks you to select the remote repository (your GitHub repository). Just copy the suggested push command (you only need to do this once per assignment).
Asking coding questions
While working on your code, you might run into a situation in which you would like one of the instructors to look at it and provide some feedback before actually reviewing and grading it. Similar to when submitting your assignment for formal review, you can create a pull request, which allows the instructor to look at, download and run your code, and type in-line suggestions. Please avoid attaching your code on an email or copying snippets of it as a pull request is a much cleaner solution for this.
To open a pull request.
- Make sure all of your code has been done in the development branch.
- Make sure you have committed the code you want reviewed.
- Make sure you have pushed your code into your GitHub repository.
- Create a pull request (GitHub's Creating a pull request documentation).
- Send an email to your instructor and include the link to your pull request.
Submitting your assignment
Once your assignment is ready for review, follow the instructions on the Canvas Assignment page where you accepted the assignment. You will need to create a pull request and create a zip file of your GitHub repository. That zip file is a record of your work for UW, but it will not be reviewed by the instructors. Note that only the code included in your pull request is reviewed.
Resubmitting your assignment
On occasion, your instructor will provide feedback on elements in your assignment that need to be modified in order to get the full grade for the assignment. In those cases, follow the exact same process (coding in development, committing and pushing your code, opening a pull request, and creating a zip file) and resubmit your code on Canvas.
Happy coding!
Assignment Example
Assignment 01
Accepting Your Assignment
Accept Assignment 01 on GitHub Classroom to get started.
Working on Your Assignment
Please follow these best practices:
- Create a development branch in your assignment repository, and write all your code within that branch (and do not commit any code to the main branch).
- Make frequent commits to this branch with good, clear messages about what you're doing and why (you will thank yourself later).
- Push your code frequently to the remote repository so that if you lose work on your computer, you can always restore from your remote repository.
Submitting Your Work
When your code is ready for review in your assignment GitHub repository:
- Create a pull request from the development branch into the master branch.
- Create a zip file of this repository.
- In Canvas, create a new submission and
- Upload the repository zip file to Canvas.
- Include the link to the pull request in the Comments field.
- Submit your assignment.
Resubmitting Your Work After Initial Review
In some case, the instructor will provide some feedback on your assignment, indicating what changes are required in order to get the full grade. The process is very similar:
- Commit any new changes to the development branch.
- Once you are ready, create a new pull request.
- Create a new zip file.
- On Canvas, follow the procedure to resubmit an assignment.